


Important HTML & CSS for React Developer
HTML and CSS Fundamentals Every React Developer Should Master: Creating Remarkable User Interfaces


Table of contents
HTML:
- Image: To display an image, you can use the
<img>element. Here's a basic example:
<img src="image.jpg" alt="Description of the image">
- Image with Attributes: You can add attributes to an image, such as width and height, like this:
<img src="image.jpg" alt="Description of the image" width="200" height="150">
- Clickable Images: To make an image clickable, wrap it in an anchor
<a>tag:
<a href="https://example.com">
  <img src="image.jpg" alt="Description of the image">
</a>
- Link Attributes: You can add attributes to anchor links, such as
targetto specify how the link should open (e.g., in a new tab or the same tab):
<a href="https://example.com" target="_blank">Visit Example.com</a>
- Audio in a Div: You can use the
<audio>element to embed audio content in your HTML:
<div>
  <audio controls>
    <source src="audio.mp3" type="audio/mpeg">
    Your browser does not support the audio element.
  </audio>
</div>
- Video in a Div: Similarly, you can use the
<video>element to embed video content:
<div>
  <video controls width="320" height="240">
    <source src="video.mp4" type="video/mp4">
    Your browser does not support the video tag.
  </video>
</div>
Video Control: The
controlsattribute in the<audio>and<video>elements adds playback controls (play, pause, volume, etc.) to the multimedia content.IFrame: To embed external content like a web page or a map, you can use the
<iframe>element:
<iframe src="https://www.example.com"></iframe>
Certainly! Here are examples and explanations for using HTML <table> and <form> elements:
- Tables:
HTML <table> elements are used to create structured data tables on web pages. You can define rows (<tr>), table headers (<th>), and table data cells (<td>) within a table. Here's a basic example:
<table border="1">
  <tr>
    <th>Header 1</th>
    <th>Header 2</th>
  </tr>
  <tr>
    <td>Data 1</td>
    <td>Data 2</td>
  </tr>
  <tr>
    <td>Data 3</td>
    <td>Data 4</td>
  </tr>
</table>
In the above example, we have a simple table with two rows and two columns. The <th> elements represent table headers, and the <td> elements represent data cells. The border attribute is used for demonstration purposes to show the table borders.
- Forms:
HTML <form> elements are used to create input forms on web pages, allowing users to submit data to a server. You can include various form elements within a form, such as text inputs, radio buttons, checkboxes, and buttons. Here's a basic form example:
<form action="process-form.php" method="post">
  <label for="username">Username:</label>
  <input type="text" id="username" name="username" required>
  <br>

  <label for="password">Password:</label>
  <input type="password" id="password" name="password" required>
  <br>

  <fieldset>
    <legend>Gender:</legend>
    <label>
      <input type="radio" id="male" name="gender" value="male" required> Male
    </label>
    <label>
      <input type="radio" id="female" name="gender" value="female" required> Female
    </label>
  </fieldset>

  <input type="submit" value="Submit">
</form>
=======================================================================
same but optimized code:
========================
<form action="process-form.php" method="post">
  <label>Username:
    <input type="text" name="username" required>
  </label>
  <br>

  <label>Password:
    <input type="password" name="password" required>
  </label>
  <br>

  <label>Gender:
    <input type="radio" name="gender" value="male" required> Male
    <input type="radio" name="gender" value="female" required> Female
  </label>

  <input type="submit" value="Submit">
</form>
In this example:
The
<form>element defines the form and specifies theactionattribute (the URL where form data should be sent) and themethodattribute (usually "post" or "get" for how the data should be sent).<label>elements are used to provide labels for the input fields, associated with theforattribute of the input elements.<input>elements represent text input fields. Thetypeattribute specifies the input type (e.g., text, password), and thenameattribute is used to identify the input when the form is submitted.The
requiredattribute is used to make the fields mandatory.The final
<input>element withtype="submit"creates a submit button to send the form data to the server.
This is a basic form example, and you can expand it with more form elements and validation as needed for your specific use case. Additionally, the action attribute should point to the server-side script or URL that will handle the form data when submitted.
Certainly, let me explain the action and method attributes in the context of an HTML <form> element:
actionAttribute:The
actionattribute specifies the URL or server-side script where the form data should be sent when the user submits the form. This URL or script will process the data and typically perform actions like saving it to a database, sending emails, or performing other server-side operations.In your example,
action="process-form.php"indicates that when the form is submitted, the data will be sent to a server-side PHP script called "process-form.php." You should replace "process-form.php" with the actual URL or script that will handle form submissions on your server.methodAttribute:The
methodattribute specifies how the form data should be sent to the server. There are two commonly used methods:POST: This method sends the form data as part of the HTTP request body. It is suitable for forms that may contain sensitive or large amounts of data, and it does not display the data in the URL. Use
method="post"when you want to submit data securely.GET: This method appends the form data to the URL as query parameters. It is less secure for sensitive data since the data is visible in the URL. However, it is suitable for simple searches or when you want to bookmark or share the resulting URL. Use
method="get"when you want to retrieve data from the server.
In your example, method="post" is used, indicating that the form data will be sent securely as part of the HTTP request body to the "process-form.php" script for processing.
Remember to create the "process-form.php" script on your server to handle the submitted data according to your specific requirements. The script will typically access the form data using server-side scripting languages like PHP, Python, or Ruby and perform the necessary server-side actions.
CSS:
explanations and examples for different CSS selectors:
Universal Selector (
*): The universal selector matches all elements in an HTML document. It is often used with caution because it can lead to inefficient CSS rules.* { /* CSS rules applied to all elements */ }Individual Selector (Element Selector): This selector targets a specific HTML element by its name.
 p {
   /* CSS rules applied to all <p> elements */
 }
Class and ID Selector: Class selectors target elements with a specific class attribute, while ID selectors target elements with a specific ID attribute.
 .my-class {
   /* CSS rules applied to elements with class="my-class" */
 }

 #my-id {
   /* CSS rules applied to the element with id="my-id" */
 }
And Selector (Chained Selector): You can chain selectors together to target elements that match multiple conditions. Elements must satisfy all conditions to be selected.
 /* Select <p> elements with class "highlight" */
 p.highlight {
   /* CSS rules applied to <p> elements with class "highlight" */
 }
 /* or */
 p.highlight.another-class {
 /* CSS rules applied to <p> elements with class "highlight" and "another-class" both to same element */
 }
Combined Selector: Combined selectors target elements that match any of the provided conditions. For example, selecting all
<a>elements within<div>elements:div a { /* CSS rules applied to <a> elements inside <div> elements */ }Selector Inside an Element: This targets elements nested inside another element. For example, targeting the
<span>elements inside a<div>with class "container":.container span { /* CSS rules applied to <span> elements inside elements with class "container" */ }Direct Child Selector (
>): This targets elements that are direct children of another element. For example, selecting all direct child<li>elements of an unordered list:ul > li { /* CSS rules applied to <li> elements directly inside <ul> elements */ }Sibling Selector (
~or+): The tilde (~) selector targets all siblings that share the same parent, while the plus (+) selector targets only the next adjacent sibling./* Select all <p> elements that are siblings of <h2> elements */ h2 ~ p { /* CSS rules applied to <p> elements that are siblings of <h2> elements */ } /* Select the first <p> element immediately following <h2> elements */ h2 + p { /* CSS rules applied to the first <p> element immediately following <h2> elements */ }
Pseudo-Selectors & Elements:
Pseudo-Selectors:4
:hover: Selects an element when the mouse pointer is placed over it. Commonly used for creating interactive hover effects.:active: Selects an element when it's being activated, typically when clicked. Used for styling buttons and links during interaction.:focus: Selects an element when it gains focus, such as when a user clicks on an input field or navigates to it using the keyboard.:nth-child(n): Selects elements based on their position within a parent element. You can specify a number "n" to target specific elements, like odd or even elements.:first-child: Selects the first child element of a parent element. Useful for styling the first element in a list or container.:last-child: Selects the last child element of a parent element.:not(selector): Selects elements that do not match a specific selector. Useful for excluding specific elements from styling.:nth-of-type(n): Similar to:nth-child, but selects elements based on their type (e.g.,div,p) rather than their position.:visited: Selects visited links, allowing you to apply different styles to visited and unvisited links.:target: Selects an element with an ID that matches the fragment identifier in the URL (e.g.,#section1).
Pseudo-Elements:
::before: Creates a pseudo-element that is inserted before the content of an element. Useful for adding decorative content.::after: Creates a pseudo-element that is inserted after the content of an element. Often used for decorative elements or tooltips.::first-line: Selects the first line of text within an element. Useful for customizing the styling of the initial line in a paragraph.::first-letter: Selects the first letter of text within an element. Commonly used for drop caps or decorative initial letters.::selection: Allows you to style the portion of text that is selected by the user with the mouse.::placeholder: Styles the placeholder text within input fields and text areas.::marker: Styles the marker of a list item (e.g., bullet points in an unordered list).::backdrop: Used for styling the backdrop behind elements withbackdrop-filterapplied (primarily used for blur effects).
These pseudo-selectors and pseudo-elements provide a wide range of options for selecting and styling elements in CSS, making it possible to create complex and interactive designs on the web.
I can provide you with some CSS examples along with their expected output:
- Hover: Applying styles when hovering over a button.
HTML:
<button>Hover me</button>
CSS:
button:hover {
  background-color: #3498db;
  color: #fff;
}
When you hover over the button, it should change its background color to #3498db and text color to white.
- Focus: Styling an input field when it gains focus.
HTML:
<input type="text" placeholder="Type here">
CSS:
input:focus {
  border-color: #ff5722;
  box-shadow: 0 0 5px #ff5722;
}
When you click on the input field or give it focus, it should have an orange border and a subtle shadow.
- First Child and Last Child: Styling the first and last list items in an unordered list.
HTML:
<ul>
  <li>First item</li>
  <li>Second item</li>
  <li>Last item</li>
</ul>
CSS:
ul li:first-child {
  font-weight: bold;
}

ul li:last-child {
  font-style: italic;
}
The first list item should have a bold font weight, and the last list item should have an italic font style.
- Custom Attributes in CSS: Styling elements based on custom attributes.
HTML:
<p data-type="important">This is important</p>
<a href="#" target="_blank">Visit OpenAI</a>
CSS:
/* Selects all elements with a "data-type" attribute equal to "important" */
[data-type="important"] {
  color: red;
}

/* Selects all links with a "target" attribute */
a[target] {
  text-decoration: underline;
}
The paragraph with the data-type="important" attribute should have red text, and the link with the target="_blank" attribute should have an underline.
Pseudo Element examples:
::before : applied to those elements that can get content inside it. eg. <div>, <p>, <h>, etc but there are some element which cannot get content inside it like <input>, user enters content inside it.
Following is the example of the form:
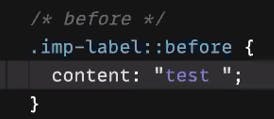

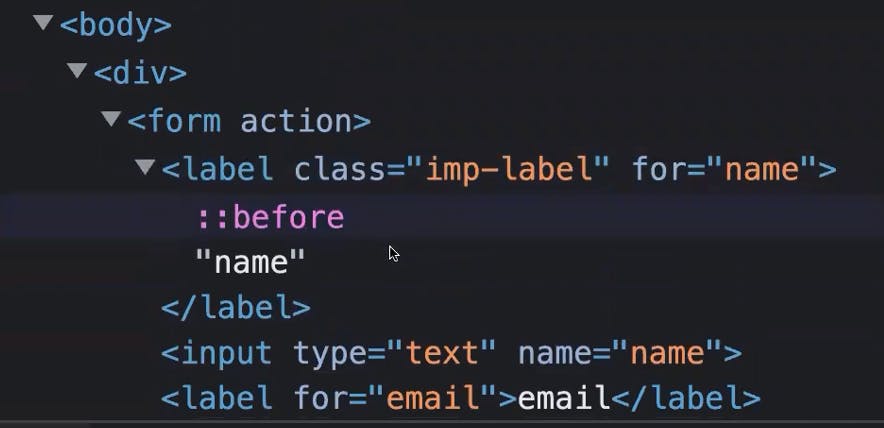
image 1: css
image 2: output of that css in html form
image 3: inspect view to see what done by the browser behind the scene while running on browser.
Position in CSS:
CSS provides several properties for controlling the positioning of elements on a web page. Here are some of the key CSS positioning properties:
position:This property is used to specify the positioning method for an element.
Values include:
static(default): The element is positioned according to the normal flow of the document.relative: The element is positioned relative to its normal position(default position by DOM structure) in the document.absolute: The element is positioned relative to its closest positioned ancestor (if any).fixed: The element is positioned relative to the viewport, and it does not move when the page is scrolled.sticky: The element is positioned based on the user's scroll position, switching betweenrelativeandfixedat a specified scroll position.
Example:
    .element {
      position: relative;
    }
top,right,bottom,left:These properties are used to specify the offset or distance of an element from its normal position based on the
positionproperty.They are commonly used with
position: absoluteorposition: fixedelements.
Example:
    .element {
      position: absolute;
      top: 20px;
      left: 50px;
    }
z-index:The
z-indexproperty specifies the stacking order of elements with the samepositionproperty (e.g.,position: absolute,position: relative) and overlapping regions.Elements with a higher
z-indexvalue appears on top of elements with lower values.
Example:
    .element1 {
      position: absolute;
      z-index: 2;
    }

    .element2 {
      position: absolute;
      z-index: 1;
    }
float:The
floatproperty is used for text wrapping and positioning elements horizontally within their parent container.Values include
leftandright.
Example:
    .element {
      float: left;
    }
clear:The
clearproperty is used to control how elements should behave when they encounter a floating element.Values include
left,right,both, andnone.
Example:
    .element {
      clear: left;
    }
display:The
displayproperty can affect the positioning of elements by changing how they are rendered in the document flow.Values include
block,inline,inline-block,flex,grid, and more.
Example:
    .element {
      display: inline-block;
    }
These CSS positioning properties are crucial for controlling the layout and placement of elements on a web page. Depending on your design requirements, you may use different combinations of these properties to achieve the desired layout and positioning effects.